When
it comes to Journalling, the best way is to Journal using Journalling
databases. Sometimes this luxury is not available and some improvising
needs to take place.
With an Edge server:
You can have Journaling set up to send to a 3rd party complioance product instead of creating journal mailboxes within your Exchange 2010 organisation. This can alleviate some storage concerns for the organisation that may not have already been factored into the original design plan.
At times there is also an Edge server involved between your internal organisations journaling to the 3rd party.
This guide will step you through setting up SMTP Journaling, to configuring your Edge server as a relay to the 3rd party journal site and some testing.


9. Click Next.
10. Click New.


With an Edge server:
You can have Journaling set up to send to a 3rd party complioance product instead of creating journal mailboxes within your Exchange 2010 organisation. This can alleviate some storage concerns for the organisation that may not have already been factored into the original design plan.
At times there is also an Edge server involved between your internal organisations journaling to the 3rd party.
This guide will step you through setting up SMTP Journaling, to configuring your Edge server as a relay to the 3rd party journal site and some testing.
Create the journal contact in EMC
1. Select Start > All Programs > Microsoft Exchange Server 2010 >
Exchange Management Console.
2. Expand Exchange server, then expand Recipient Configuration
3. Click Mail Contact under Recipient Configuration.
4. In the Mail Contact page (a), click New Mail Contact in the Actions pane
(b).
5. Select the New Contact option (a) and then click Next (b).
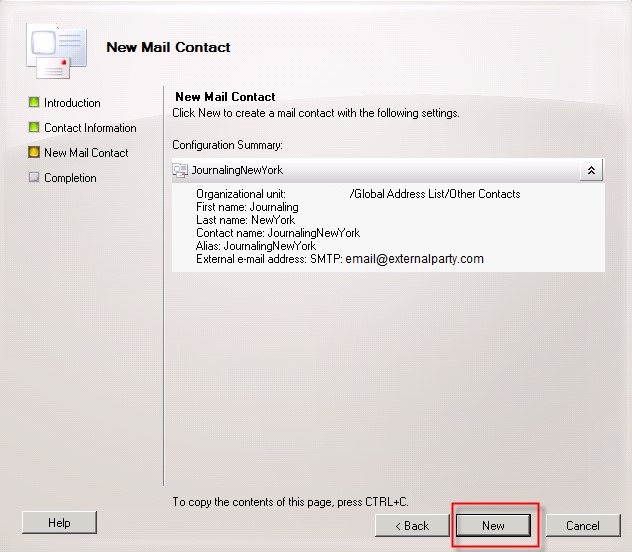
7. In the New Mail Contact window, type Journaling in the First Name field,
Contact in the Last Name field and JournalingNewYork in the Alias field (a).
Click Edit (b).

8. Type the journaling address provided to you (company@providor.net) and then click OK

9. Click Next.

10. Click New.

11. Click Finish.
Create an SMTP send connector
1. Select Start > All Programs > Microsoft Exchange Server 2010 >
Exchange Management Console.
2. Expand your Exchange server, then expand Organization Configuration.
3. Click Hub Transport.
4. Click the Send Connectors tab.
5. In the Actions pane, click New Send Connector.
6. Type eg: SENDCON-EDGE-Journal for the Name field, for the Select the intended
use for this Send connector drop-down list, select Custom (a). Click Next
(b).

7. Click Add. The SMTP Address Space window opens.
8. In the Address field, type the Address Space (eg: *.providor.net) (a). Leave the cost at 1 and then
click OK (b).

9. Click Next.
10. Select the Route mail through the following smart hosts option and then
click Add.
11.
Select the IP address option, type the smart host provided to you and
then click OK. (add the 2 autonomy edge servers 10.10.10.70;
10.10.10.71, as seen below in figure 1)


12. Click Next.
13. Select None for the Configure smart host authentication settings and then
click Next.
14. Add all the HUB server’s , Click Next.

15. Click New.
16. Click Finish.

You should have a new send connector that looks like the one below:

Activate journaling
1. Select Start > All Programs > Microsoft Exchange Server 2010 >
Exchange Management Console.
2. Expand Exchange server.
3. Expand Organization Configuration.
4. Click Mailbox.
5. In the Database Management tab, right click your mailbox database and select
Properties.

6. Click the Maintenance tab.
7. Select the Journal Recipient check box (a), and then click Browse.

8. Select JournalingNewYork (email@externalparty.com)(a) and then click OK (b).

9. Click OK.
You have successfully activated message journalling.
For the remaining database’s run this cmdlet for each:
eg:
Set-MailboxDatabase -Identity NYC* -JournalRecipient "newyork/Global/Other contacts/Journalling"
| Note:
Your Journalling set up is now complete. If journalling stops for an
extended period of time, we cannot recover lost email. However, there is a troubleshooting guide at the end of this document. | |||
| Edge Server configuration | |||
| |||
| Set up relay connector On the Edge server, open up Powershell for Exchange and type in the following cmdlets. | |||
| New-ReceiveConnector -Name "Journal Relay" -Usage Custom -PermissionGroups AnonymousUsers -Bindings <remote journal server IP>:25 -RemoteIpRanges 10.10.10.70;10.10.10.71 | |||
| Get-ReceiveConnector "Journal Relay" | Add-ADPermission -User "NT AUTHORITY\ANONYMOUS LOGON" -ExtendedRights "Ms-Exch-SMTP-Accept-Any-Recipient" | |||
2: Disable default internal receive connector.


3.Setup unique message header


4. Troubleshooting
1) Telnet from edge server to Autonomy server (IP: 10.10.10.70)
ie: telnet 10.10.10.70 25
ie: telnet 10.10.10.70 25
2) Ensure Microsoft exchange transport services are running. If not, start it.

3) Perform Message tracking on edge using Exchange Powershell cmdlet:
eg)
Get-messagetrackinglog –recipients email@externalparty.com

No comments:
Post a Comment